
August 28, 2026
Embedded insurance works best when I place the offer inside the customer’s normal flow, keep the choice simple, and make claims easy to handle later. If I force people to switch sites, enter the same data twice, or call support, conversion drops and service feels messy.
Here’s the short version:
A few numbers stand out. API-led embeds can produce 3.5x to 6.8x higher attach rates than stand-alone offers. Digital claims portals can push claim starts above 90%. And a first response within 1–2 business days is a solid service target.
So the core idea is simple: show coverage when it makes sense, keep it out of the way when it doesn’t, and make post-sale help easy to find.
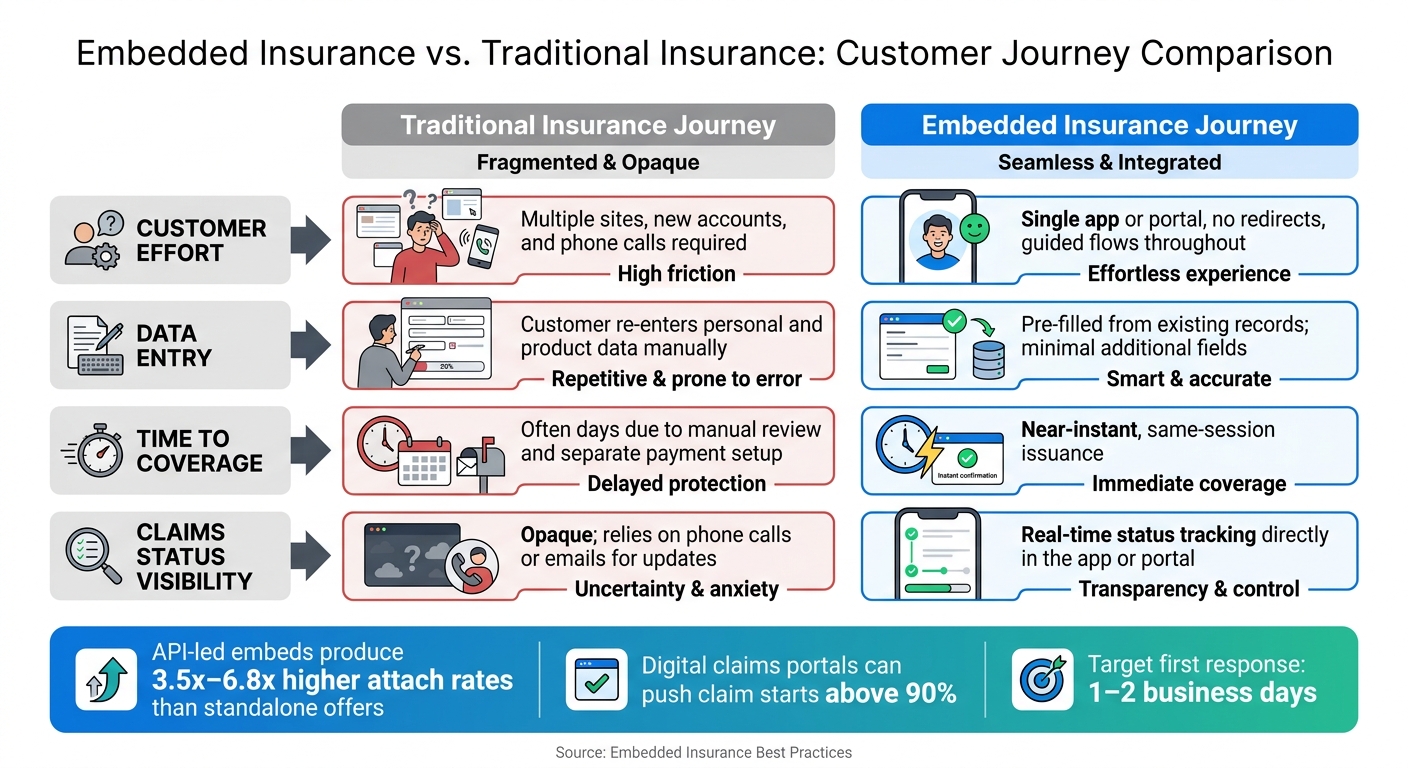
Embedded Insurance vs. Traditional Insurance: Customer Journey Comparison
Map the customer journey to find the first point where embedded insurance removes friction without adding extra steps. Look at each stage from the customer's point of view, not from inside your internal system.
At each stage, note what the customer is trying to get done, what data you already have, and where things break down. Watch drop-off around redirects in particular. That's often where friction starts to hurt conversion.
The table below shows how common friction points differ in a standard insurance journey versus an embedded one:
| Journey Step | Traditional Experience | Embedded Insurance Experience |
|---|---|---|
| Re-entering data | Customer re-enters personal and product details on a separate insurer's site | Coverage options are prefilled using existing account and purchase data in the same flow |
| Waiting for a quote | Multi-page form or phone call; quote may take several minutes or longer | Instant quote generated from existing profile and transaction data |
| Completing purchase | Separate insurance enrollment with an additional payment step | Single-click add-on during checkout; one consolidated payment |
| Claims initiation | Customer searches for a policy number, calls support, or logs into a separate portal | A "Report damage" button inside the same app, with incident details prepopulated |
Not every friction point should turn into an offer. Pick one that feels obvious to the customer and easy to act on.
After you've mapped the friction, choose one moment to start with. In the U.S. market, device activation, checkout for a high-value item, and account funding are often strong entry points. At those moments, customers are already thinking about what they could lose, so a simple yes-or-no offer fits the flow.
Score each candidate touchpoint using four factors:
Go for relevance over traffic. Skip products that need long disclosures or complicated suitability checks. Choose the moment with the clearest risk, the simplest decision, and the strongest revenue impact. Start with simple, additive protections.
Once you've picked the moment, shape the offer and support flow around it. That decision affects the experience across onboarding, checkout, servicing, and claims.
Design the flow so coverage shows up only when it helps and never gets in the customer’s way. The aim at every stage is simple: lower customer effort so onboarding, servicing, and claims feel like one connected journey, not three separate tasks.
Show the insurance offer as a single, clearly labeled module next to the main purchase choice, with a link to fuller terms instead of hiding it in fine print. The offer should spell out, in plain English, what’s covered, what’s not covered, and the full price, such as "$7.99/month". Use an unchecked checkbox or toggle for opt-in. Labels like "Optional protection plan" work well, and there should be a visible "Remove coverage" control.
Keep the flow light by pre-filling the fields you already know: name, address, product details, and purchase date. For a smartphone retailer, that means sending the device make, model, and purchase price straight to the insurer’s API so the customer doesn’t have to type them again. When the platform is tied together well, the quote, eligibility check, and policy bind all happen in the same flow. The customer sees the price right away, pays once, and gets confirmation on the same screen.
Those same choices should carry over into servicing and claims too.
After purchase, insurance should sit where customers already manage their account. A coverage card in the account dashboard should show the insurer name, coverage type, limits, renewal date, and a "View details" link. Send the policy document right after purchase with the order ID or booking number so customers can match it to the right transaction. Then send renewal reminders 30 days before renewal and again 7 days before, using U.S. date formatting, such as "Your plan renews on March 15, 2027". If the premium is changing, show that clearly in U.S. dollars.
Post-purchase design matters most when something goes wrong. An embedded "File a claim" button on the order detail page can open a guided FNOL form that fills in the customer’s name, policy number, and product details, then lets them upload photos or receipts and submit. Digital FNOL systems can pre-populate claim files within 30–90 seconds once the loss event is transmitted, which cuts down manual intake time in a big way.[1][2] Status should appear in the app with labels like "Received", "Under review," and "Approved," and those same labels should appear in email or SMS. Walnut Insurance supports this with claim intake, routing, and broker help inside the partner’s existing channels.
The table below shows how embedded insurance changes the experience across four key areas:
| Aspect | Traditional Insurance Journey | Embedded Insurance Journey |
|---|---|---|
| Customer effort | Multiple sites, new accounts, and phone calls required | Single app or portal, no redirects, guided flows throughout |
| Data entry | Customer re-enters personal and product data manually | Pre-filled from existing records; minimal additional fields |
| Time to coverage | Often days due to manual review and separate payment setup | Near-instant, same-session issuance |
| Claims status visibility | Opaque; relies on phone calls or emails for updates | Real-time status tracking directly in the app or portal |
The gap comes down to this: does the post-sale experience feel clear, or does it feel opaque? Once that experience is set, the next step is matching the integration model to the flow it needs to support.
Once the journey is mapped out, pick the lightest setup that still keeps the experience intact. Every model gives you a different mix of speed and depth.
The right choice usually comes down to three things: engineering bandwidth, how fast you need to launch, and how smooth you want the customer experience to feel.
Link-based is the simplest path. You place a co-branded button or banner on your site, and customers click through to a partner microsite to get a quote and buy coverage. It’s fast to launch, but there’s an obvious handoff. People leave your platform to finish the purchase.
Data-driven referral flows sit in the middle. Your platform sends customer or transaction data, like cart contents, device details, or ZIP code, so the hosted quote page shows up with forms already filled in. That small change can make a big difference. Pre-filled forms can lift quote completion and bind rates by double digits, especially on mobile.[3]
API-driven embeds go much deeper. Quote, bind, issue, and cancel all happen inside your own app or portal, with no redirects. This route takes more engineering work and close attention to data security and state-level compliance. But the payoff can be much stronger: API-driven embeds can drive attach rates 3.5–6.8 times higher than standalone offers.[4]
Walnut Insurance supports all three models, which makes it easy to start small and build from there as the journey develops.
Its no-code link-out needs no engineering work. The data-driven referral link adds a light API setup that passes customer data to pre-fill quotes. The API-driven integration gives product teams full control to build native quote, bind, issue, and cancel flows inside their own UI, across personal, commercial, and group coverage.
Across all three paths, Walnut provides instant quote and bind capabilities, full compliance support, and multi-channel broker assistance.
Use the table below to line up implementation depth with your business goals.
| Model | Implementation Effort | Depth of Embedding | Data-Sharing Level |
|---|---|---|---|
| Link-based | Low | Surface-level (redirect) | Minimal |
| Data-driven | Medium | Moderate (contextual, pre-filled) | Moderate (structured fields) |
| API-driven | High | Deep (fully native in product) | High (real-time, bidirectional) |
A practical way to handle this is to start with the lightest model that can show clear value. Run a pilot, watch demand, and then move to a data-driven or API-driven model once attachment rates and conversion data show there’s room to go deeper.
If insurance is an optional add-on, link-based or data-driven is often the best place to begin. If it’s part of the core product, like integrated group benefits inside a payroll platform, API-driven tends to fit that long-term direction better.
After launch, focus on the part of the journey you changed most. Then track a few core metrics to see if the flow is doing its job: onboarding attachment, checkout conversion, and claims performance.
Attachment rate - the share of eligible customers who add coverage when offered - is one of the clearest signs of product fit. If attachment is low, look at the offer’s messaging, timing, pricing, and placement.
Quote-to-bind conversion tells you how many customers finish the purchase after starting the insurance flow. It helps to pair that with step-level drop-off. If abandonment spikes right when insurance appears, the flow may be adding friction instead of helping.
On the service side, track first-response time. A first response within 1–2 business days is a reasonable target. Also watch the share of claims submitted digitally. Well-built embedded claims portals can push digital initiation above 90%.[5] Better digital claims flows also improve satisfaction. It’s also worth comparing churn rates between customers who added insurance and those who didn’t.
Those signals help you pinpoint the problem. Is it placement? Wording? Pricing? Or is the issue sitting in the claims flow?
Start with the single high-value moment you mapped earlier. Keep the first rollout small - around 10%–20% of eligible traffic - and set clear thresholds before launch:
That gives you a real benchmark. You’re not just watching numbers bounce around. You’re checking performance against a standard.
Tag insurance-related support tickets by stage - checkout, servicing, and claims - and review them every week. If customers keep getting stuck at the same step, that usually points to a problem with placement, wording, or disclosure.
As you expand across more states or product lines, keep disclosures and consent state-compliant. Offers should clearly name the insurer, explain coverage and exclusions, and keep the insurance add-on visually and functionally separate from the core purchase. That separation matters because it helps avoid negative-option risk.
Embedded insurance works best when the experience stays relevant, simple, and continuous from the first offer through the claim. The playbook is pretty plain: map the journey first, find one high-value insurable moment, build onboarding and claims flows that cut effort, choose an integration model that fits your current capabilities, and keep measuring outcomes so the experience gets better over time.
The best embedded insurance feels native to the product - there when customers need it, out of the way when they don’t.
The best time to offer embedded insurance is at digital touchpoints where customers are already paying attention, like point of sale, account setup, or post-purchase interactions.
At these point-of-need moments, coverage feels like a natural part of the customer journey instead of an extra step. That can lead to stronger engagement and more conversions. Walnut supports these timely integrations with API and no-code options.
It depends on your technical resources and the kind of customer experience you want to deliver.
If you need to launch fast and have limited technical support, link-based or no-code options usually make the most sense. They’re easier to set up and let you get started without much lift.
If you want full control, deeper customization, and a native experience, API-driven integration is the better route. Just know there’s a trade-off: it needs a developer team and usually takes 2 to 4 weeks to set up.
Start with customer experience and conversion. Track quote-to-bind time and customer satisfaction first, then watch performance KPIs to shape your next moves.
Use integrated analytics and monitoring to see how people move through the flow. That gives you a clear view of user behavior, so you can fine-tune the embedded journey based on the customer experience happening in real time.